3. Hello, little turtles!
There are many modules in Python that provide very powerful features that we can use in our own programs. Some of these can send email, or fetch web pages. The one we’ll look at in this chapter allows us to create turtles and get them to draw shapes and patterns.
The turtles are fun, but the real purpose of the chapter is to teach ourselves a little more Python, and to develop our theme of computational thinking, or thinking like a computer scientist. Most of the Python covered here will be explored in more depth later.
3.1. Our first turtle program
Let’s write a couple of lines of Python program to create a new turtle and start drawing a rectangle. (We’ll call the variable that refers to our first turtle alex, but we can choose another name if we follow the naming rules from the previous chapter).
import turtle # Allows us to use turtles
wn = turtle.Screen() # Creates a playground for turtles
alex = turtle.Turtle() # Create a turtle, assign to alex
alex.forward(50) # Tell alex to move forward by 50 units
alex.left(90) # Tell alex to turn left by 90 degrees
alex.forward(30) # Complete the second side of a rectangle
wn.mainloop() # Wait for user to close window
If you copy and paste this program into a new IDLE module, and run it, it doesn’t run in the shell like our programs so far: instead, a new window pops up! (If you run it here in the ebook by clicking the “Run” button, a simulation of this window will appear within the book.)
Here are a couple of things we’ll need to understand about this program. (Don’t worry if you don’t understand them all now—we’ll cover them in more detail as we work through the book.)
The first line tells Python to load a module named turtle. That module brings us two new types that we can use: the Turtle type, and the Screen type. The dot notation turtle.Turtle means “The Turtle type that is defined within the turtle module”. (Remember that Python is case sensitive, so the module name, with a lowercase t, is different from the type Turtle.)
We then create and open what it calls a screen (we would prefer to call it a window), which we assign to variable wn. Every window contains a canvas, which is the area inside the window on which we can draw.
In line 3 we create a turtle. The variable alex is made to refer to this turtle.
So these first three lines have set things up, we’re ready to get our turtle to draw on our canvas.
In lines 5-7, we instruct the object alex to move, and to turn. We do this by invoking, or activating, alex‘s methods — these are the instructions that all turtles know how to respond to.
The last line plays a part too: the wn variable refers to the window shown above. When we invoke its mainloop method, it enters a state where it waits for events (like keypresses, or mouse movement and clicks). The program will terminate when the user closes the window. (Note: in our ebook, you can’t “close” the turtle window once it’s open. The wn.mainloop() line is there for when you run the program on your own computer inside of IDLE. If you leave it out, then your turtle program will never terminate, and you’ll have to shut down IDLE to continue working.)
An object can have various methods — things it can do — and it can also have attributes (sometimes called properties). For example, each turtle has a color attribute. The method invocation alex.color("red") will make alex red, and drawing will be red too.
The color of the turtle, the width of its pen, the position of the turtle within the window, which way it is facing, and so on are all part of its current state. Similarly, the window object has a background color, and some text in the title bar, and a size and position on the screen. These are all part of the state of the window object.
Quite a number of methods exist that allow us to modify the turtle and the window objects. We’ll just show a couple. In this program we’ve only commented those lines that are different from the previous example (and we’ve used a different variable name for this turtle):
import turtle
wn = turtle.Screen()
wn.bgcolor("lightgreen") # Set the window background color
wn.title("Hello, Tess!") # Set the window title
tess = turtle.Turtle()
tess.color("blue") # Tell tess to change her color
tess.pensize(3) # Tell tess to set her pen width
tess.forward(50)
tess.left(120)
tess.forward(50)
wn.mainloop()
When we run this program, a new window pops up. (Note: in this ebook, the turtle windows don’t have titles, so the line wn.title("Hello, Tess!") does nothing. But if you copy and paste this program into a module on your compute and run it in IDLE, you’ll see that the title bar of the window says Hello, Tess!.)
3.2. Instances — a herd of turtles
Just like we can have many different integers in a program, we can have many turtles. Each of them is called an instance. Each instance has its own attributes and methods — so alex might draw with a thin black pen and be at some position, while tess might be going in her own direction with a fat pink pen.
import turtle
wn = turtle.Screen() # Set up the window and its attributes
wn.bgcolor("lightgreen")
wn.title("Tess & Alex")
tess = turtle.Turtle() # Create tess and set some attributes
tess.color("hotpink")
tess.pensize(5)
alex = turtle.Turtle() # Create alex
tess.forward(80) # Make tess draw equilateral triangle
tess.left(120)
tess.forward(80)
tess.left(120)
tess.forward(80)
tess.left(120) # Complete the triangle
tess.right(180) # Turn tess around
tess.forward(80) # Move her away from the origin
alex.forward(50) # Make alex draw a square
alex.left(90)
alex.forward(50)
alex.left(90)
alex.forward(50)
alex.left(90)
alex.forward(50)
alex.left(90)
wn.mainloop()
Here are some observations about this program:
- There are 360 degrees in a full circle. If we add up all the turns that a turtle makes, no matter what steps occurred between the turns, we can easily figure out if they add up to some multiple of 360. This should convince us that alex is facing in exactly the same direction as he was when he was first created. (Geometry conventions have 0 degrees facing East, and that is the case here too!)
- We could have left out the last turn for alex, but that would not have been as satisfying. If we’re asked to draw a closed shape like a square or a rectangle, it is a good idea to complete all the turns and to leave the turtle back where it started, facing the same direction as it started in. This makes reasoning about the program and composing chunks of code into bigger programs easier for us humans!
- We did the same with tess: she drew her triangle, and turned through a full 360 degrees. Then we turned her around and moved her aside. Even the blank line 18 is a hint about how the programmer’s mental chunking is working: in big terms, tess‘ movements were chunked as “draw the triangle” (lines 12-17) and then “move away from the origin” (lines 19 and 20).
- One of the key uses for comments is to record our mental chunking, and big ideas. They’re not always explicit in the code.
- And, uh-huh, two turtles may not be enough for a herd. But the important idea is that the turtle module gives us a kind of factory that lets us create as many turtles as we need. Each instance has its own state and behavior.
3.3. The for loop
When we drew the square, it was quite tedious. We had to explicitly repeat the steps of moving and turning four times. If we were drawing a hexagon, or an octogon, or a polygon with 42 sides, it would have been worse.
So a basic building block of all programs is to be able to repeat some code, over and over again.
Python’s for loop solves this for us. Let’s say we have some friends, and we’d like to send them each an email inviting them to our party. We don’t quite know how to send email yet, so for the moment we’ll just print a message for each friend:
for f in ["Joe","Zoe","Brad","Angelina","Zuki","Thandi","Paris"]:
invite = "Hi " + f + ". Please come to my party on Saturday!"
print(invite)
# more code can follow here ...- The variable f in the for statement at line 1 is called the loop variable. We could have chosen any other variable name instead.
- Lines 2 and 3 are the loop body. The loop body is always indented. The convention is to use 4 spaces of indentation for our loop bodies. The indentation determines exactly what statements are “in the body of the loop”.
- On each iteration or pass of the loop, first a check is done to see if there are still more items to be processed. If there are none left (this is called the terminating condition of the loop), the loop has finished. Program execution continues at the next statement after the loop body, (e.g. in this case the next statement below the comment in line 4).
- If there are items still to be processed, the loop variable is updated to refer to the next item in the list. This means, in this case, that the loop body is executed here 7 times, and each time f will refer to a different friend.
- At the end of each execution of the body of the loop, Python returns to the for statement, to see if there are more items to be handled, and to assign the next one to f.
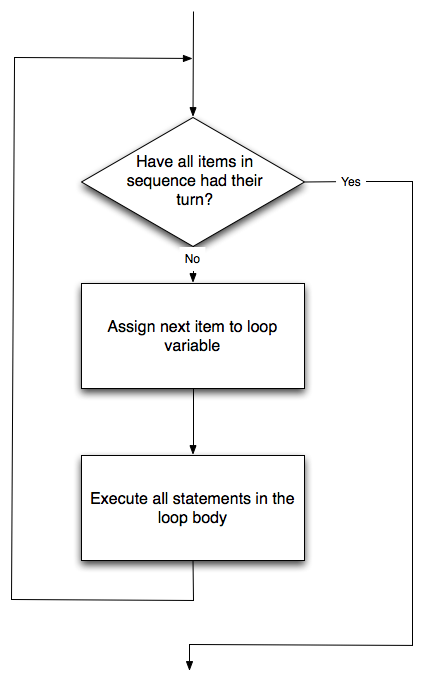
3.4. Flow of Execution of the for loop
As a program executes, the interpreter always keeps track of which statement is about to be executed. We call this the control flow, of the flow of execution of the program. When humans execute programs, they often use their finger to point to each statement in turn. So we could think of control flow as “Python’s moving finger”.
Control flow until now has been strictly top to bottom, one statement at a time. The for loop changes this.
Flowchart of a for loop
Control flow is often easy to visualize and understand if we draw a flowchart. This shows the exact steps and logic of how the for statement executes.
3.5. The loop simplifies our turtle program
To draw a square we’d like to do the same thing four times — move the turtle, and turn. We previously used 8 lines to have alex draw the four sides of a square. This does exactly the same, but using just three lines:
import turtle
wn = turtle.Screen() # Set up the window and its attributes
alex = turtle.Turtle() # Create alex
for i in [0,1,2,3]: # Draw the four sides of the square
alex.forward(50)
alex.left(90)
wn.mainloop()
Some observations:
- While “saving some lines of code” might be convenient, it is not the big deal here. What is much more important is that we’ve found a “repeating pattern” of statements, and reorganized our program to repeat the pattern. Finding the chunks and somehow getting our programs arranged around those chunks is a vital skill in computational thinking.
- The values [0,1,2,3] were provided to make the loop body execute 4 times. We could have used any four values, but these are the conventional ones to use. In fact, they are so popular that Python gives us special built-in range objects:
for i in range(4):
# Executes the body with i = 0, then 1, then 2, then 3print("i = "+str(i))
for x in range(10):
# Sets x to each of ... [0, 1, 2, 3, 4, 5, 6, 7, 8, 9]print("x = "+str(x))
- Computer scientists like to count from 0!
- range can deliver a sequence of values to the loop variable in the for loop. They start at 0, and in these cases do not include the 4 or the 10.
- Our little trick earlier to make sure that alex did the final turn to complete 360 degrees has paid off: if we had not done that, then we would not have been able to use a loop for the fourth side of the square. It would have become a “special case”, different from the other sides. When possible, we’d much prefer to make our code fit a general pattern, rather than have to create a special case.
So to repeat something four times, a good Python programmer would do this:
for i in range(4):
alex.forward(50)
alex.left(90)
By now you should be able to see how to change our previous program so that tess can also use a for loop to draw her equilateral triangle.
But now, what would happen if we made the change below? Try to figure out what’s going to happen, then run the code to see if you’re right!
import turtle
wn = turtle.Screen() # Set up the window and its attributes
alex = turtle.Turtle() # Create alex
for c in ["yellow", "red", "purple", "blue"]:
alex.color(c)
alex.forward(50)
alex.left(90)
wn.mainloop()
A variable can also be assigned a value that is a list. So lists can also be used in more general situations, not only in the for loop. The code above could be rewritten like this:
import turtle
wn = turtle.Screen() # Set up the window and its attributes
alex = turtle.Turtle() # Create alex
clrs = ["yellow", "red", "purple", "blue"]
for c in clrs:
alex.color(c)
alex.forward(50)
alex.left(90)
wn.mainloop()
3.6. A few more turtle methods and tricks
Turtle methods can use negative angles or distances. So tess.forward(-100) will move tess backwards, and tess.left(-30) turns her to the right. Additionally, because there are 360 degrees in a circle, turning 30 to the left will get tess facing in the same direction as turning 330 to the right! (The on-screen animation will differ, though — you will be able to tell if tess is turning clockwise or counter-clockwise!)
This suggests that we don’t need both a left and a right turn method — we could be minimalists, and just have one method. There is also a backward method. (If you are very nerdy, you might enjoy saying alex.backward(-100) to move alex forward!)
Part of thinking like a computer scientist is to understand more of the structure and rich relationships in our field. So revising a few basic facts about geometry and number lines, and spotting the relationships between left, right, backward, forward, negative and positive distances or angles values is a good start if we’re going to play with turtles.
A turtle’s pen can be picked up or put down. This allows us to move a turtle to a different place without drawing a line. The methods are
import turtle
wn = turtle.Screen() # Set up the window and its attributes
alex = turtle.Turtle() # Create alex
alex.penup()
alex.forward(100) # This moves alex, but no line is drawn
alex.pendown()
wn.mainloop()
Every turtle can have its own shape. The shapes available are arrow, blank, circle, classic, square, triangle, turtle.
import turtle # Allows us to use turtles
wn = turtle.Screen() # Creates a playground for turtles
alex = turtle.Turtle() # Create a turtle, assign to alex
alex.shape("turtle") # Shape alex to look like a turtle
alex.forward(50) # Tell alex to move forward by 50 units
alex.left(90) # Tell alex to turn by 90 degrees
alex.forward(30) # Complete the second side of a rectangle
wn.mainloop() # Wait for user to close window
We can speed up or slow down the turtle’s animation speed. (Animation controls how quickly the turtle turns and moves forward). Speed settings can be set between 1 (slowest) to 10 (fastest). But if we set the speed to 0, it has a special meaning — turn off animation and go as fast as possible.
alex.speed(10)
A turtle can “stamp” its footprint onto the canvas, and this will remain after the turtle has moved somewhere else. Stamping works, even when the pen is up.
Let’s do an example that shows off some of these new features all together:
import turtle
wn = turtle.Screen()
wn.bgcolor("lightgreen")
tess = turtle.Turtle()
tess.shape("turtle")
tess.color("blue")
tess.penup()
size = 20
for i in range(30):
tess.stamp() # Leave an impression on the canvas
size = size + 3 # Increase the size on every iteration
tess.forward(size) # Move tess along
tess.right(24) # ... and turn her
wn.mainloop()
Be careful now! How many times was the body of the loop executed? How many turtle images do we see on the screen? All except one of the shapes we see on the screen here are footprints created by stamp. But the program still only has one turtle instance — can you figure out which one here is the real tess? (Hint: if you’re not sure, write a new line of code after the for loop to change tess‘ color, or to put her pen down and draw a line, or to change her shape, etc.)
3.7. A Turtle Bar Chart
Here are even more new tricks for our turtles:
- We can get a turtle to display text on the canvas at the turtle’s current position. The method to do that is called write:
import turtle # Allows us to use turtles
wn = turtle.Screen() # Creates a playground for turtles
alex = turtle.Turtle() # Create a turtle, assign to alex
alex.forward(50) # Tell alex to move forward by 50 units
alex.left(90) # Tell alex to turn by 90 degrees
alex.forward(30) # Complete the second side of a rectangle
alex.write("Hi there!") # Write a message
wn.mainloop() # Wait for user to close window
- We can fill a shape (circle, semicircle, triangle, etc.) with a color. It is a two-step process. First we call the method alex.begin_fill(), then we draw the shape, then we call alex.end_fill(). Below is an example of this using our square example from earlier.
import turtle
wn = turtle.Screen() # Set up the window and its attributes
alex = turtle.Turtle() # Create alex
alex.begin_fill() # Start of the region to fill
for i in range(4): # Draw the four sides of the square
alex.forward(50)
alex.left(90)
alex.end_fill() # Fill the region
wn.mainloop()
- We’ve previously set the color of our turtle — we can now also set its fill color, which need not be the same as the turtle and the pen color. We use the fillcolor method to set the turtle’s fill color:
import turtle
wn = turtle.Screen() # Set up the window and its attributes
alex = turtle.Turtle() # Create alex
alex.color("blue") # Set pen color to blue
alex.fillcolor("red") # Set fill color to red
alex.begin_fill() # Start of the region to fill
for i in range(4): # Draw the four sides of the square
alex.forward(50)
alex.left(90)
alex.end_fill() # Fill the region
wn.mainloop()
Ok, so can we get tess to draw a bar chart? Let us start with some data to be charted,
xs = [48, 117, 200, 240, 160, 260, 220]
Corresponding to each data measurement, we’ll draw a simple rectangle of that height, with a fixed width. We’re showing off a new programming concept called a function in the example below: we’re defining the function draw_bar to draw a bar of our graph. We’ll generally want to use a function to encode a complicated task that we’ll want to repeat many times (like drawing a bar in a bar graph). Don’t worry too much about the syntax of functions right now — we’re going to discuss functions in a lot more detail in the next chapter.
import turtle
wn = turtle.Screen()
wn.bgcolor("lightgreen")
tess = turtle.Turtle()
tess.color("blue")
def draw_bar(t, height):
""" Get turtle t to draw one bar, of height. """t.left(90)
t.forward(height) # Draw up the left side
t.right(90)
t.forward(40) # Width of bar, along the top
t.right(90)
t.forward(height) # And down again!
t.left(90) # Put the turtle facing the way we found it.
t.forward(10) # Leave small gap after each bar
xs = [48, 117, 200, 240, 160, 260, 220] # our data
for v in xs: # Draw a bar for each number in the data
draw_bar(tess, v)
wn.mainloop()
Ok, not fantasically impressive, but it is a nice start! The important thing here was the mental chunking, or how we broke the problem into smaller pieces. Our chunk is to draw one bar, and we wrote a function to do that. Then, for the whole chart, we repeatedly called our function.
Next, at the top of each bar, we’ll print the value of the data. We’ll do this in the body of draw_bar, by adding t.write(' ' + str(height)) as the new third line of the body. We’ve put a little space in front of the number, and turned the number into a string. Without this extra space we tend to cramp our text awkwardly against the bar to the left. The result looks a lot better now:
import turtle
wn = turtle.Screen()
wn.bgcolor("lightgreen")
tess = turtle.Turtle()
tess.color("blue")
def draw_bar(t, height):
""" Get turtle t to draw one bar, of height. """t.left(90)
t.forward(height) # Draw up the left side
t.write(" " + str(height)) # Write the data
t.right(90)
t.forward(40) # Width of bar, along the top
t.right(90)
t.forward(height) # And down again!
t.left(90) # Put the turtle facing the way we found it.
t.forward(10) # Leave small gap after each bar
xs = [48, 117, 200, 240, 160, 260, 220] # our data
for v in xs: # Draw a bar for each number in the data
draw_bar(tess, v)
wn.mainloop()
And now we’ll add code to fill each bar. Our final program now looks like this:
import turtle
wn = turtle.Screen()
wn.bgcolor("lightgreen")
tess = turtle.Turtle()
tess.color("blue")
tess.fillcolor("red")
def draw_bar(t, height):
""" Get turtle t to draw one bar, of height. """t.begin_fill() # Start of the fill area
t.left(90)
t.forward(height) # Draw up the left side
t.write(" " + str(height)) # Write the data
t.right(90)
t.forward(40) # Width of bar, along the top
t.right(90)
t.forward(height) # And down again!
t.left(90) # Put the turtle facing the way we found it.
t.end_fill() # Fill in the bar
t.forward(10) # Leave small gap after each bar
xs = [48, 117, 200, 240, 160, 260, 220] # our data
for v in xs: # Draw a bar for each number in the data
draw_bar(tess, v)
wn.mainloop()
Mmm. Perhaps the bars should not be joined to each other at the bottom. We’ll need to pick up the pen while making the gap between the bars. We’ll leave that as an exercise for you!
3.8. Glossary
- attribute
- Some state or value that belongs to a particular object. For example, tess has a color.
- canvas
- A surface within a window where drawing takes place.
- control flow
- See flow of execution in the next chapter.
- for loop
- A statement in Python for convenient repetition of statements in the body of the loop.
- loop body
- Any number of statements nested inside a loop. The nesting is indicated by the fact that the statements are indented under the for loop statement.
- loop variable
- A variable used as part of a for loop. It is assigned a different value on each iteration of the loop.
- instance
- An object of a certain type, or class. tess and alex are different instances of the class Turtle.
- method
- A function that is attached to an object. Invoking or activating the method causes the object to respond in some way, e.g. forward is the method when we say tess.forward(100).
- invoke
- An object has methods. We use the verb invoke to mean activate the method. Invoking a method is done by putting parentheses after the method name, with some possible arguments. So tess.forward() is an invocation of the forward method.
- module
- A file containing Python definitions and statements intended for use in other Python programs. The contents of a module are made available to the other program by using the import statement.
- object
- A “thing” to which a variable can refer. This could be a screen window, or one of the turtles we have created.
- range
- A built-in function in Python for generating sequences of integers. It is especially useful when we need to write a for loop that executes a fixed number of times.
- terminating condition
- A condition that occurs which causes a loop to stop repeating its body. In the for loops we saw in this chapter, the terminating condition has been when there are no more elements to assign to the loop variable.